Thursday, March 28, 2013

It must be five o'clock. Or at least four o'clock.

Canoe: Part 4

Terrific progress has been made this week. By end of day tomorrow, planking will be complete. The canoe came off the form today.

Fairing of the ribs was completed in a couple of hours, then the first planks were laid commencing at the centreline. We were able to lay about four or five planks each side before tapering was required. Since the canoe is fatter in the middle (as are the builders) than the ends, the planks need to be wider in the centre and taper towards the ends. Scott has this nifty marking gauge which determines the shape required at each rib. It’s just a matter of connecting the dots and sawing the shape on the bandsaw. If you get lucky, a few swipes with plane will allow the plank to lay up snugly with its neighbour.

The planking has to be stopped shy of completion so the canoe can be lifted from the form. The ends of the planks can’t be fastened to the stems until removal since the stems have to be able to move in order to clear the form.

After we removed the canoe and set it upright, the  interior was revealed for the first time. I must say it was a beautiful sight. The colour of the cedar and all the lovely curves make you realize how lovely a wooden canoe can be. So, after admiring our work, temporary lashings were put in place to hold the canoe near its final shape and the planks were fastened to the stems. Next, the stem was trimmed to height and bevels cut on the ends of the inwales so they could be screwed  and epoxied together, tying the ends of the canoe together.

Tomorrow, The last planks will be fit and then the boat will be shifted to my shop for fairing, glassing and final fitout and finishing. Great stuff!  (See below for photos.)
Sanding the ribs - very good for the waistline.
Using a board to check for high spots
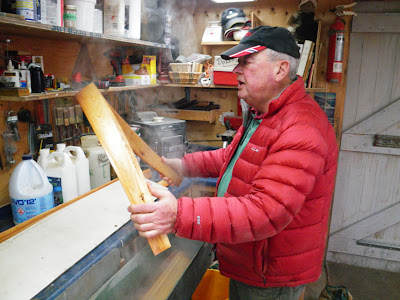
Hot water keeps the planks flexible and soft so they can take the wicked twist on the bow.
The aforementioned wicked twist.
First planks fastened.
Scott's nifty and simple marking tool for trimming the planks.
High tech.
And he does it all with a pipe in his hand or in his mouth. 
As far as we go with the planks while the canoe is on the mould.
She's free! She's free!
Trussed up and waiting for epoxy to dry on the inwales.

Sunday, March 24, 2013


Canoe - Part 3

Yesterday was an exciting day. Scott and I bent the ribs around the form so there is now tangible evidence of a canoe taking shape.

Earlier in the week, I cut the bevels on the stems and Scott attached them to the form. Notches for the ribs that cross them were marked and chiseled out so they would sit flush with the stems.

The ribs had been soaking for several days, then were boiled for about half an hour before we attempted to bend them. It was amazing how easily they conformed to the required shapes. With one of us on either side of the form, the rib is slid under a strongback attached to the centerline  which prevents the rib from lifting as it is bent. The rib is held in position temporarily with a clamp to the inwale while we drill pilot holes for the bronze ring nails, two per rib. After about two hours all was finished: it looks like the skeleton of some large marine animal. As you will see in the photos, we only put in every other rib on the form since we are covering the boat with epoxy and fibreglass rather than canvas. This will result in a lighter but just as strong canoe as the glass/epoxy will provide structural strength where canvas is mainly just for waterproofing.

Next step is fairing the ribs with a long sanding board in preparation for the planking. I’ll have to wait a few days for everything to dry before this step. In the meantime, I’ll carry on building up varnish in the seats and yoke and carve out a paddle for myself. See below for more photos.
Notches cut in the stem
Nice curvy bit
A mess of boiled ribs
Very bendy
Bending the first rib
Clamping
fastened
Okay, says Scott. That's enough for today. 
Ribbed...

Sunday, March 17, 2013

Canoe, part 2


While waiting for the stems to take their shapes, I’ve been busy making paddles. Never made them before, they’re quite fun to do. It means you can customize them to fit your personal preferences.

Susan’s has been completed. Made from cherry, it’s what is known as an ottertail shape, wider at the top than the bottom. She checked the grip several times while it was in the making which I refined to ensure it was comfortable in her hand. It’s amazing how many shavings can be spokeshaved off the rough shape to get the blade down to a final slim thickness. It weighed out at under two pounds. Probably could reduce it a bit further but we’ll try it first and see how she goes. More photos below.


Thursday, March 14, 2013

Captain Dusty starts a new project

Randy's going to take over for a while and blog about his new project - a fabulous canoe that will be ready just in time for bug season. Take it away, Randy.

Today was the official start of building a canoe with my neighbour and friend Scott Cain. Scott has built dozens of canoes over the years and has agreed to teach me how to put one together on his form. The result will be a beautiful 15‘ cedar canoe, weighing about 55 lb., trimmed in mahogany and cherry.

In fact, the work began a couple of weeks ago, shaping and sanding the 1/4“ white cedar ribs and the 1/8“ cedar planking. Beautiful clear stock Scott had from New Brunswick, such a treat to work with, easily sanded and planed with the bonus of smelling good as well. I also trued up the 3/4“ ash for stems and the 16‘ mahogany strips for the gunwales.

Scott provided me with patterns for the seats and carrying yoke which I’ve made from cherry. My new shop in the basement has been a big improvement over the one in the garage, the main benefit being I can work in the winter since there is a woodstove, plus the space is larger and well lit, with a great view through the double patio doors to the back yard and lake.

Today we bent the stems around the form. The ash soaked for two or three days then was boiled this morning for about an hour and a half. The ends of two pieces were wedged in the form and Scott eased them around the bend while I drove wedges to lock them in place. One of them broke but having forseen this probability, we had 5 pieces prepared so the replacement took the curve, no problem. These will stay on the form now for a couple of days to take a set then installed on the canoe form. Stay tuned next week as construction begins. See below for more photos (captions by SB).


Starting the bend. The one on the right cracked a second later and Scott said a bad word. Then they backed it off and got another freshly boiled stem from the box. Pays to have backup. 
Scott bends, Randy inserts the bolts and drives the wedges in to hold the stems tight against the form. 
Doesn't seem right to make wood bend this much, but apparently it's been done before.
Guys in their natural habitat.
You can never have too many clamps.
On the left is a 100-year-old 12.5' Peterborough or Chestnut canoe that Scott is restoring. On the right is the mould for the new canoe. 

Canoe ribs - prepped and ready to steam. More scary bending in the future.
Homemade steam-boiling box. Makes the shop rather like a sauna. My glasses kept steaming up. 


Free Web Counter